Sunday, September 3, 2017

Deuter AC Lite 26 lit

Stok Kangri - Sept 18
Before going to Roopkund in June 2017, I bought a smaller backpack that I would carry during the trek. I had decided to give my main back pack for the mules to carry and take a small pack for myself. This would carry my camera gear, my rain wear, my down jacket, medicines, some basic snacks, water bottles etc. In Sandakhphu I used my Lowepro for the job. But then I did not have anything other than my camera gear, water and some very basic snacks. Sandakphu was much easier than Roopkund and also I would have access to the porter, should I really need something. Roopkund would be different and my Lowepro wouldn't be able to carry it all. 

Finally I zeroed in on the Deuter 26 lit AC Lite, which I bought off Amazon. It came in the colours black and granite. I am not too fussy about the colour of my pack. 

I am quite happy with my purchase and would recommend the Deuter brand for anyone who wants to go for it and needs a validation.

The sack looks small but it has an incredible ability to accommodate whatever you give it. I gave it a Canon 7D with 24-70 lens, also fondly called the brick. I had another 18-55 lens wrapped in possibly a lightweight base layer from Columbia. I had the Marmot Precip rainwear (upper) and the Marmot down jacket. I possibly had a towel too. These went into the main sack. In the compartment meant for the hydration pack, I kept the food/snacks. Some date palms and other stuff. Not much bulk or weight. I also kept a few spare socks and the poncho I bought from IH in Wan. It was very very small. Less than palm size (and completely useless in rain).

The sack was certainly not full at all. There was a lot of space. 

The top cover of the sack has two zippered pockets. One inside and another outside. I kept my camera accessories like batteries, cards and cleaning kit inside. The outside pocket carried my red diary, medicines and lots of this and that including my wallet, phone, GPS, plane and train tickets etc.

My sack weighed a total of about 7 kgs. 
The backbreaking trail from Pathar Nachauni to Kallu Vinayak - Roopkund '17

The sack came with a rain cover. In fact I had kept my Precip in the small opening at the bottom with the rain cover !!!

The straps are very nice and comfortable on the shoulder and chest. You could adjust them on the go without much hassle. The waist strap is more like a belly strap because the sack itself is small and I am 5'10" :-) But that's fine. I had no problem walking with it except when I was panting really hard (and I breathe through my belly). But it is easy to readjust the waist strap.

This sack can accommodate a hydration pack and has the facility to take out the pipe. But I kept my water bottles on the two mesh side pockets outside. I would have loved to have a vertical pocket outside. 

The only con of the sack is it is difficult to keep it standing on the ground. That might well be because of the nature of the items that I put inside the sack. If I had kept my sleeping back in it, it would have easily stood its ground. 

There are other usual features like loops for trekking pole etc but I didn't use them. 

The sack is not water proof at all. I walked in snowfall that turned into a rain for a couple of hours without putting the rain cover. I was feeling too lazy and kept telling myself - the sack was born in Germany. I am sure it will stop the water. The sack was thoroughly drenched when I reached camp. 

Overall it's a nice value for money sack. Lightweight. No frills. Ideal for a multi-day trek when you are giving away your main sack for porters to carry. I am happy with the purchase.

Long Term Use Report

I have now used the sack for three trips. Roopkund, Netherlands and Stok Kangri. There are a few negatives that come out that are worth talking about. A. The mesh of the side pocket got torn. I have no clue how. But it did get torn a bit. I guess I will have to repair it with Gorilla tape. The rain cover, which does a fantastic job of protection against rain, got torn possibly during some flight where the sack was booked as a cabin luggage. Here also I will have to perhaps use either Gorilla tape or replace it altogether.

The third point of course is its non-waterproofness. Otherwise, it's a great bag. 

Sunday, August 20, 2017

Deuter 2.5 lit Waist Pack

Looking rather smug in front of the Van Gogh Museum :-) 


After the Roopkund trek of 2017 I realised my good old leather waist pack (I call it a belt pouch) is not adequate enough for the demands of a modern travel anymore. These days our tickets - train or plane - are all A4 sized paper. My old pack, robust and strong though it is, is not large enough to accommodate them. It is not wide enough either and if I put my wallet then there is no place for anything else. 

This prompted me to go for a larger waist pack and after my first experience with the Deuter 26 lit backpack, I did not think twice about the brand. I bought it ahead of the Amsterdam trip. It arrived on 24th July and turned out to be a good purchase. 

(Of course some digitally inclined folks might suggest why not carry your ticket in your phone? Well I don't trust the phone to function all the time under all circumstances, even if I don't lose it while travelling. So I carry my A4 sized paper tickets with me. Smart Alecs can keep their opinions to themselves and trust their digital gadgets. I want to stay old fashioned in these things.)

I chose to go for the largest available size. The price difference between the smallest (I think 1 lit) and this wasn't much, though that wasn't the reason really to go for the 2.5 lit. The pack, despite being quite large (it is way larger than my leather belt pouch) doesn't seem bulky around the waist. In Amsterdam I carried it around with loads of stuff like my passport, red note book, tickets, mobile phone, charger and even the power bank. It never protested. I think if I took the thick red diary out it could even carry my wallet also. 

I don't know how they manage it but Deuter has this remarkable ability to create a lot of space inside their bags without them looking too big. My 26 lit back pack is also similar. Lots of space for a backpack of that size. 

The only downside to this bag is that it is not easy to adjust the size of the belt on the go, which is often a requirement especially when you are out walking with the pack on day-long trips.

I foresee using this pack in virtually all my trips from now on.  

Wednesday, August 16, 2017

Meindl Antelao

The new boots on my dining table. Sorry for the hideous table cloth
I bought a pair of Meindl Antelao GTX boots the other day. This is meant for walking in the mountains. I have a pair of Quechua that are decent but I always wanted to have a pair of big brand hiking shoes and I used the opportunity of the Amsterdam visit to buy it. I had originally wanted to buy the Scarpa R-Evolution but that did not quite happen and I will tell the story later. Suffice it to say that I went for the Antelao and I am happy for that, although I think I would have preferred the Scarpa for its price.

I bought this boot from Amsterdam's Kathmandu store on 9th August 2017. It's a large chain of outdoor gear stores in The Netherlands. This particular shop is on Haarlemarstraat near the Central Station. I wore the pair in the shop and it felt instantly good and comfortable as I walked on their test area - essentially a heap of logs kept artistically in the middle of the store. 

Earlier I had worn another pair of Meindl at Bever (another chain) but it felt a little too stiff and not that comfortable, particularly on the up trail (they also have a track). 

My regular boot size is 8. This is the first time perhaps that I bought a pair of walking boots in size 8.5 UK or Euro 42.5. So far it looks like it fits me very well. I think a few years ago I got a pair of Asics which was also the same size and it also fitted me very well. I guess that is my right size for activity oriented boots. Actually my left foot is slightly larger than my right foot. And 8.5 is absolutely right for the left foot. 

Earlier this year while coming down from Roopkund - we walked downhill for 11 hours - I felt my left foot was very snug inside the boot and did not move at all. But the right foot was moving inside the boot (a pair of Quechua 500 in size 8). I thought I would get blister on my right foot for the internal movement. But as things turned out, the big toe nail of my left foot, I later realised, died out. Because it had got too tight. The small toe nail still pains from all the compression. I am not sure if there is a small stress fracture there. I don't think all this will ever happen again with these Antelaos because there is enough space here without being loose.

We have to remember that after a long walk our feet swell a little and a half size cushion is good for the feet. My regular office wear shoes will always be 8, if not 7.5. But my walking or running shoes will be 8.5 from now on.

Vibram soles and Gore-tex linings are now standard and de riguer 


One of the things that Meindl highlights about the Antelao is that they are meant for wider feet. I did not know that I had wide feet. I mean I always thought my feet were wide but by European standards I would have thought they were just about normal. That's not quite the case, I realised. Because I find the fit of these shoes very comfortable. 

These are class B shoes with a flexible sole and are therefore very comfortable to walk in. Almost like sports shoes. Class C shoes are not really ideal for lightweight walking on the non-snowy trails. They have stiff soles that do not flex with your feet. Therefore the walk becomes uncomfortable. Those shoes are best for the snowy trails where you need to wear crampons or microspikes at least. 

In typical, average Himalayan treks we start from very high altitude, relative to European trails, but we experience snow much later - perhaps for a day or two towards the end of the trek. For that kind of walking one does not really need Class C boots. If I was starting most of my trails in the high mountains with snow then I would probably go for the stiffer ones. 

The Antelao has a few features that Meindl talks about. I will come to those later, but first let me speak about the exterior features that are apparent to even a casual viewer. The laces start from almost the toes. That's a good thing. One can add extra tension or slack to the toes area to control and fine tune the toe box. Next is the rand - the rubber band around the boot to protect it from rocks and other stuff on the trail. It is only a half rand and not full. The other Meindl that I checked had full rand all around. I am not sure if the full rand gives any extra rigidity or it is just that the rigid shoes also come with a full rand. 

Half rand, synthetic loop for ankle and no loop behind heel (negatives)


Most trekking boots have a loop behind which can be used to hang them. I have never really used them but cannot fail to note their absence here. The loops give a boot a professional look setting them apart from normal boots. Antelao does not have them. 

Antelao has metallic hooks for the laces and the laces are pretty long and thick. But the hook around the ankle is of synthetic loop kind. I don't know what difference this makes but I have never seen this in true blue trekking boots. 

The fit is indeed comfortable
The upper of the boot is a combination of suede (or nubuck?) and mesh. Again four season trekking shoes almost never have any mesh on them. But the mesh adds an element of comfort to these shoes and presumably should make the boots more airy (leading to less sweat on feet). The suede is anthracite in colour. If there was a brown option I would have perhaps gone for that. But lot of Europeans like the subtle anthracite colour.

Now comes the interior of the boot. It has the white inner lining of Goretex. This should make the boot waterproof. Unless water seeps in from the top, for example if I have to wade through water that is deeper than its height, my feet will remain dry for sure. I have worn Goretex lined boots (the other Timberland) in blinding rain and my feet have been bone dry. 

Insole. Downloaded from the net
The footbed is apparently made of cork and covered with fleece. It also has something like a PU shock absorber. I don't know about all the technology but the feel is surely very nice. I spoke to the Kathmandu store assistant about the footbed and whether I should go for some 3rd party sole. She took the sole out and gave it a good look. Then she said, this is obviously very good quality. Don't change it till it lasts. So I take her word for all it is worth. I liked the feel of standing inside the boots. 

Now comes the sole. The Vibram sole certainly feels very sticky. This will give a lot of confidence on rocky surfaces. My Aku was a lot more slippery. It was a stiff sole boot meant to be worn with heavy loads on the back. However, I must clarify that I have so far walked with them only on the shop floor and test track of the Kathmandu store in Amsterdam and here in my flat in Calcutta. So it is obviously not enough to pass a final verdict on it. But when you test a good thing the first impression is enough. 

These boots don't need any break in period. They are very flexible already and in a way broken in. The question is I will be going for a maximum of two treks a year. And the first one will be sometime in April/May next year. Before that I intend to wear it at least once a month or twice. Oherwise the gumming might come off.

I have to now see how long these last. Durability is definitely something I expect from a German brand. I hope Meindl will not disappoint me.

Once I complete a proper trek in them, I will write a more detailed account of that feel. 

Fresh out of the box, with the tags intact

Field Test Report

I walked in these boots during my September '18 trek to Stok Kangri. That was my first real tes of the boots. More than a year after its purchase. I went upto a height of 6000 meters plus in these boots. I walked through fresh snow, crossed a small glacier two times (while going up in the darkness of the night and once while coming down in broad day light), walked through shallow streams, walked down dusty trails, walked in snowfall and rain. The shoes were quite tested, to put it very mildly. I walked almost continuously for 19 hours. Not for a moment did I regret buying this. On the contrary, I am happy I bought them and wore them to Stok. If I was wearing my Quechua I would surely lose both my nails on the two big toes, like I did after the Roopkund climb down to Wan from Bhagwabasa (almost a day long walk downhill). Of course that's more of a size issue than the intrinsic quality of the boots. But I am very happy with this purchase of mine.

At Delhi airport
I don't know what to say but these boots just did their job of keeping my feet well protected and dry. I never got any blisters. Didn't slip or skid. In fact the soles are very grippy and have good brakes. Didn't get my feet wet. Half the time didn't feel the boots were there. Of course I never walked in any deep water and never really let water come over the neck of the boot. Even then, the waterproofness of the boot is 100 per cent in snow and shallow ankle deep water. My upper body, on the penultimate day got completely drenched when I walked for a couple of hours in a light drizzle without a rain coat. But my feet were dry and warm.

The outer Vibram soles were great in snow, mud and dust. Possibly a full protection against abrasions would've been better (only the toes are covered with half a rand) but that's fine. I didn't really walk over very rocky trails. Will see how it performs on such trails in future.

On snow I used Kahtoola microspikes. Because we were walking on fresh, soft snow, snowballing was becoming a major issue. But the boot has nothing to do with it. In fact at one point of time I took the microspikes off and walked only in the boots and the snowballing was somewhat reduced. However, I felt less secure and so put the Kahtoolas back on again.

Incidentally, because it's nubuck, the boot lost its colour on the very first day on the dusty trail out of Stok village. Probably in the very first hour. But a gentle dusting back at home and they are back to being new.

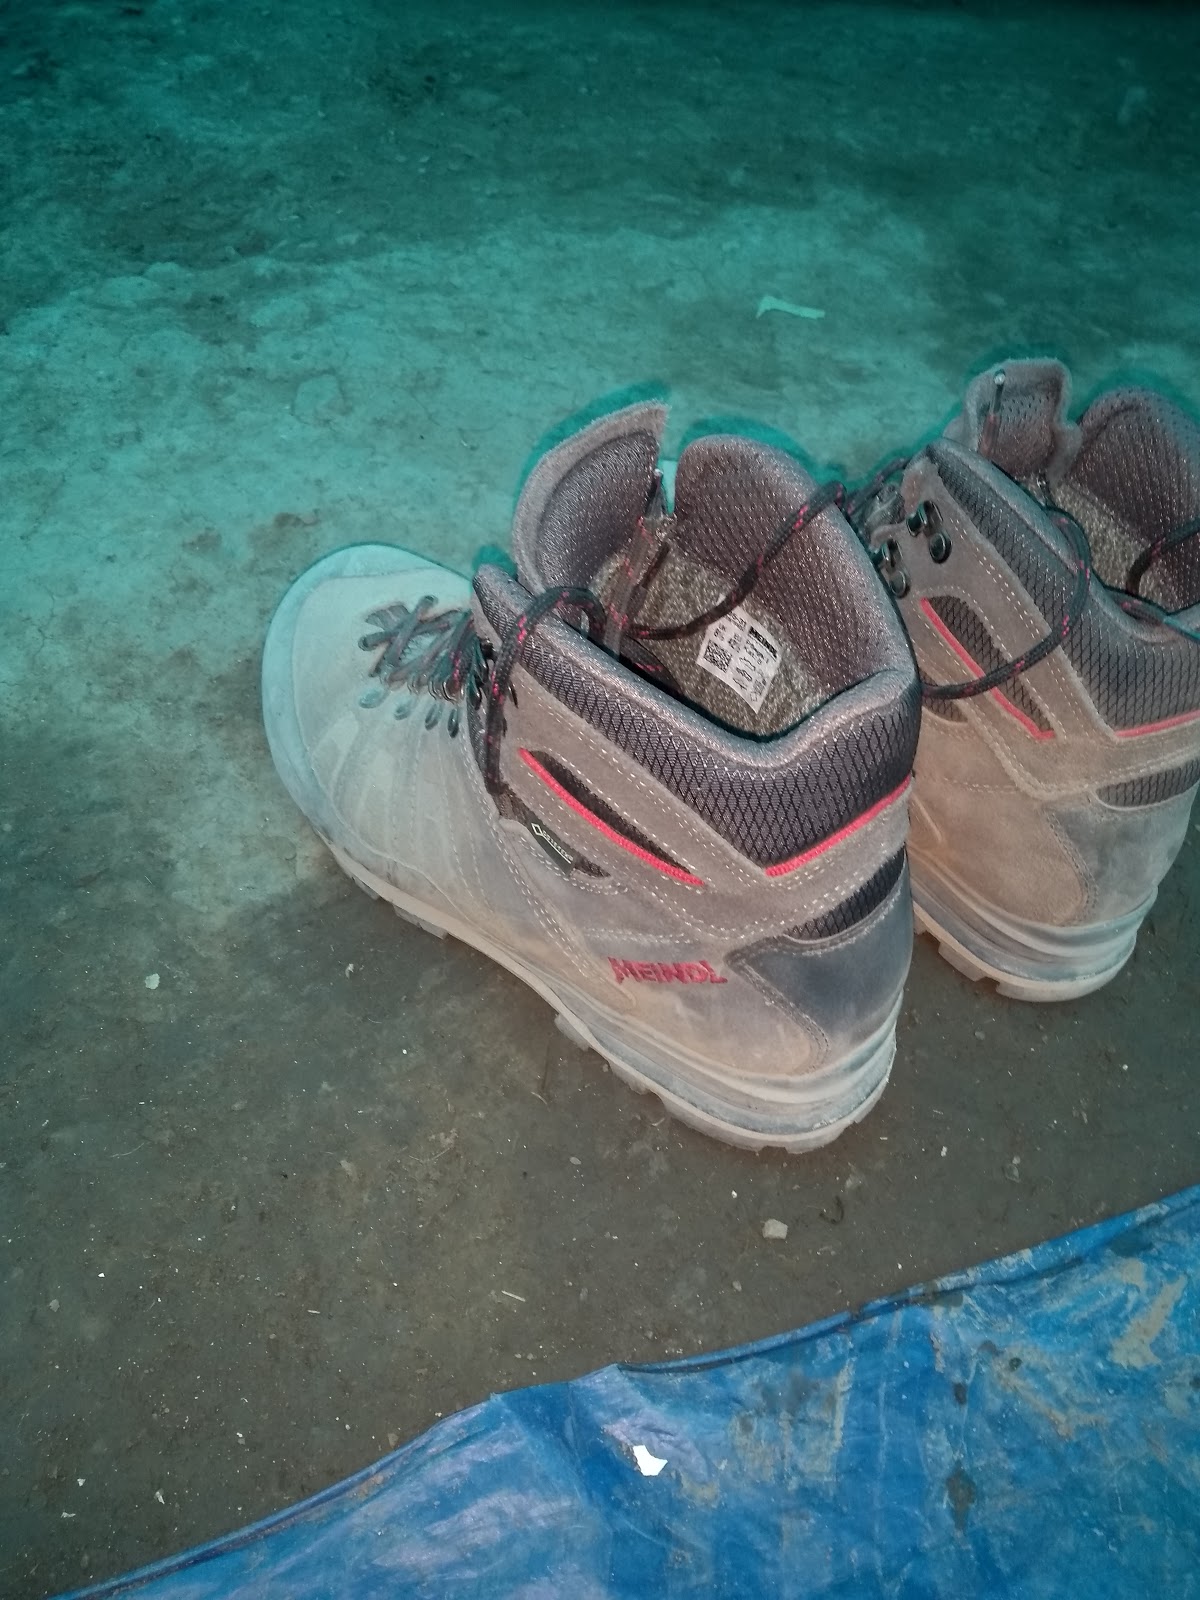
On a rainy day in camp
I just hope that these Meindls lasts for a long time. I am expecting a good 10 years and at least 15 long treks in them. Anything less than that - I will be disappointed. But I have to ensure that I wear them every now and then, just to keep them going. Otherwise, the pasting can come off.

Sitting inside my tent on a rainy day, doing nothing, at the Base Camp above 15,000 feet, I felt rather bored. So I took this rather innocuous looking picture of the boots outside my tent in the vestibule area. One can see the dust and how it changed its colour. A full grain leather boot wouldn't lose its colour like this. But then, it regained the colour at home after getting a sharp dusting. I am yet to wash them with soap and spray any Nikwax. I will, shortly. The internet advices using dishwasher detergent for this purpose. But it seemed no shopkeeper in Calcutta has ever heard of dishwasher in the first place. The detergent for that is understandably a far cry. I guess, I will make do with Eezee. I just hope the waterproofness is not compromised.


Saturday, August 12, 2017

Blast of Light - Black Diamond Storm


The Black Diamond Storm that I bought in 2017 August from Amsterdam offers the strongest light in the market at this point in time. All of 350 lumens. I mentioned the month and year because every now and then they come out with a new and improved version making the previous model obsolete. So by the time one reads this, the 2017 model might well have become a very back dated one.

Here is a link to the company's website.  I don't know if this will work once the unit goes out of production some time in future.

Why The Storm 

I bought the Storm principally for two reasons. A. It is climate proof. Both dust and water. That's a great help out in the field while trekking or going on adventure trips. Not that I foresee walking in the rains in the dark with this on. But out in the Himalayas rain is ALWAYS a possibility and I have a considerable investment in rain protecting myself and my gear. This is one of the reasons for my upgrade from the Tikina. B. It has a huge amount of light available. The highest in the market. Well, there are other brighter units available but they use different batteries and are not only expensive and heavy, they are for specialist rescuers which I am not. Also many of the 400+ lumen lights consume a lot of batteries, therefore not suitable for multi-day Himalayan treks. Among trekking headlamps this is perhaps the highest and strikes a great balance between power output and energy consumption. My Tikina has 80 lumens, by the way.

First Impression Before Field Use

The unit looks and feels pretty robust. More robust than my Petzl Tikina (which is a very nice, cute and easy to use thing to have around the house. It's also feather light). The back of the unit is rubberised plastic giving it a smooth yet robust feel. It has a nice hook/clip to open the rear chamber for inserting batteries (picture below), much like my Vanguard water tight case's clips. The Tikina's rear chamber is tricky to open and always feels like it might break (it doesn't).

The Storm uses four AAA batteries which adds a little weight to the unit but that's just fine. The four batteries are kept in a smart way so that it doesn't take up a lot of space. The Tikina is far less energy efficient. It uses 3 AAA for only 80 lumens.


Next is attaching the storm on the head. The strap is nice and smooth and thicker material than the Tikina's. Adjusting for size is simple. Just slide the clip along the strap. The Storm has a soft pad behind where it touches your forehead. The Tikina does not have any pad but still manages to give a snug fit.

Tilting the Storm on the head is just a little notchy. Probably because it is a little heavier. I have to just get used to it.

Now operating the Storm. The Storm indeed comes with far too many bells and whistles. A. it has two lights. One large flood in the middle. Another side one for peripheral vision and these can be switched on one at a time or both together. B. It has a coloured light on the other side offering three colours - red, green and blue. C. It has the strobe feature for all the lights. D. You can dim all the different lights. E. You can also lock the unit when travelling so that the switch is not engaged accidentally when the unit is packed in the sack.

Also, the Storm has a memory of its own. That is, it starts the light from where you had switched it off last. If you switch off on red in a certain brightness, that is exactly how it will switch on the next time.

For all these features there is just one switch on the top !!!! This makes the task daunting, to say the least. It has a power tap feature on the side. But I have to get the hang of using it. The unit can be dimmed by just tapping on the side. I didn't get the tap right every time that I tried. I think I will gradually become an expert.

Essentially it's all about playing with the switch. You tap it once - it does something. Tap it twice quickly it does something else. Long press it for 4 seconds and the unit is locked. Do that again and it is unlocked. These sort of things. I think I will get used to it as I use it over the years. There is no rocket science here. I will work them out in the field through trials.  I refuse to learn it all because I will soon forget them all.
Features as published on the REI site


The product features graphic from REI mentions something slightly misleading. "Rechargeable: No". I had assumed that it means the unit cannot use rechargeable batteries. What I realise now, much to my delight, is that it does use rechargeable batteries. What they mean is this unit as a whole cannot be recharged, like a mobile phone or my Garmin Forerunner. There are several models of headlamps that can be only USB recharged. They are of no practical use in Himalayan treks. In fact this is one of the reasons why I cannot carry my Forerunner on my treks.

The unit has a feature to indicate the state of battery power. A green lamp lights up for a few seconds first indicating the battery power is full. I believe it abruptly goes dark instead of gradually dimming with the battery. I have to see how it behaves. I would prefer the abrupt darkness feature.


My Amsterdam Purchases

Last night I came back from a very short trip to Amsterdam. It was a dealers' conference with lots of internal company managers. I was one of them. It was a short 3-day trip to the beautiful city. 

I took the opportunity of the visit to buy a few items related to my passion for trekking. All very functional things that are either not available in India or are very expensive if available here. 

I will just note down the main items in one place and hence this post. I will later individually review them. 

The absolute first item that I bought was a Black Diamond Storm. As much as 350 lumens of light. It came with 4 new Duracell batteries. Next on the agenda were two 20 lit Sea to Summit dry bags. One for Mampu and another for myself. I later realised that both come in the same dull blue colour. Next in line was a Granger detergent to wash my rainwear and other delicate type items. I finished the visit to Bever with two Nite Ize S-biners. 

After these two I also bought a 5-in Asics split from the Asics concept store next to Bever. But the most important purchase was from Kathmandu - a pair of Meindl Antelao mid rise boots. I also topped it off with a Nik Wax.

I had originally intended to buy the Scarpa R-Evolution from Bever but they goofed up my order on Monday and on Wednesday when I went to get it they said the original order was never placed. Quite a disgusting state of efficiency.

Anyway, the Meindl is a very good fit. One never knows how the Scarpa would have been. But it was available at a very good price as it was on discount. But anyway. All's well that ends well. 

Thursday, July 27, 2017

Marmot Catalyst 3P

The new Marmot Catalyst 3P - a three-person, three season basic dome tent from the US outdoor gear maker that I love so much - arrived today. I bought it from Amazon as there was a good deal available on the site. The price works out to about Rs 1000 more than the current price of the same product on REI, USA. I have reasons to believe Marmot is testing the waters in India through Amazon before a full fledged entry into the market. Few of its useful products are available in India at almost their US prices.

The rolled tent is just out of its bag


Curiosity had the better of us and we decided to pitch the tent right away in our drawing room (without the fly sheet of course) and check it out. 

The tent is packed in a nice stuff sack that is fairly roomy. So if you want you can just stuff it in without carefully folding it up like the way we stuff down sleeping bags. There are five different items to be found inside. The blueish ground sheet, the actual tent or canopy, the flysheet, 3 poles in a thin sack, in another small sack there are 6 copper colourd stakes, one small repair kit for a broken pole (if and when that happens), some guy line and tensioners. I didn't open the guy line ball because I wasn't going to use the flysheet this evening. 

Setting up, as usual for a dome tent, is fairly simple. A matter of few minutes really and the tent was up in our living room with no fuss. I think even Mampu can do it alone perhaps. It's that simple. 

Now a few basic first impressions about the tent. 

First the ground sheet. It's deep blue in colur and slightly smaller than the tent's footprint. Apparently this is done to ensure water does not seep in. I felt the material is a little too thin to take care of rough rocky surfaces. We will have to see how strong it is in real life situations in the field. It might well be strong but it certainly is not thick. 

On top of the ground sheet you spread the canopy. The canopy is half mesh and half opaque material. This is not a four season tent mind you. It is not meant for extreme cold or heavy snow. I do not know how warm it will stay in sub zero temperatures but ventilation will certainly be good due to the mesh. I like feeling well ventilated even if it is very cold. Four season tents aren't that great for ventilation and I feel a little suffocated in them.

Monisha peeping out on the first night


However, for places like Chadar where you own breath freezes into droplets of ice on the ceiling of your tent, this tent might not be ideal or you have to spread a tray (I think gear loft is the technical term for it) above you (there are provisions for doing that). 

The canopy has various clips strategically placed around it to attach to the poles. The tent has two D shaped doors on either side on the longer sides. One on the opaque side and another on the mesh side. 

We engaged the two orange poles of equal length and put their ends in the four corners. After this it is just a matter of pulling the clips up and attaching to the poles. It's fairly intuitive. After this it was the turn to set up the third and much smaller pole. 

It's grey in colour and shaped like a gentle bow. There are two pockets on the two sides where you insert the ends. This pole is meant to add more stability to the tent and make the awning create a porch kind of place outside the mesh side door. It also adds some head room in the tent so that you don't feel claustrophobic while sitting inside.

The canopy material is 40 denier polyester mesh and taffeta but the floor material is slightly thicker 48 denier taffeta. The stitches are seam sealed. I am hoping (from various reviews) that it will not leak on a rainy night. In Himalaya you cannot trek and expect not to have rains, regardless of your season.

I did not spread the fly sheet because my room is not large enough and one does need to stake the fly sheet. So I do not know how large it is. The material has a nice feel and is very colourful. Electric orange, to be precise. I do not know if the guy lines are attached to it (probably not). Will have to check it out next time I take it out.

The inside of the tent isn't very roomy. I have a Coleman Sun Dome. That is much larger (but nowhere close to this in terms of quality and modernity). The floor has a fancy name called "catenary cut". What this means is the edges go up vertically and not inclined. Inclined edges have a problem. They touch you (typically on your side or arms) and if it rains it might make you wet where the tent touches your body.

There are a few side pockets to store this and that. The zips are very good quality. The commercial reviews make a big deal of the pocket on the ceiling where you can keep your torch for diffused ambient light. I tried that out with my Petzl. No great shakes. Just hype. I would rather hang it from the centre hook.

Overall I guess it's a nice tent. I love it. I hope it comes to some real use. I intend to take it to my Nanda Devi Sanctuary trek and then add further points on how it fared in the field.

A screen shot from the REI website for the features

Field Report After Stok Kangri Hike (Sept 2018) 

I recently went hiking to Stok Kangri with Tashi as the tour guide cum operator and Chadar friends for company. I took the tent along and used it for about ten nights in various conditions. Stok village was sunny, Mankarmo was cold, Base Camp was cold and it rained and snowed heavily one night. So this tent has already seen it all (except terribly windy conditions). Here are my reflections on the tent after actually using it in the field.

1. Pitching Ease -  child's play really. Any one can pitch it alone within minutes. I did not tie all the guy lines as the conditions were not very windy. The six stakes (four corners plus two doors) are enough to keep the tent in position. I ignored using small guy line loops and two more stakes to pull the two side panels off the canopy. This stupidity resulted in a little water seeping into the tent.

2. Waterproof - The tent was tested in severe rain fall and snowfall and it came off with flying colours. Not a drop of water seeped in, once guy lines on the side panels were properly tied. One issue with the tent is that, if water spills out of a bottle or some water seeps in, one has to mop that up - either with a mop or with some newspaper or something. It is best to carry a piece of rag for such emergencies in future. There is no way the tent material is going to soak up any spilt water. 

I must say, in the mountains it does not rain as heavily as it does in the plains during monsoon. I am not too sure how this tent will hold up against such severe monsoon rains of the plains. But for Himalayan rains it is fine. Listening to the pitter patter of the rain on the fly sheet had a wonderful soothing effect on the nerves. 

3. Snowproof - This tent is not meant to be a four season tent. It is not supposed to be pitched in a snowfall prone region like the Stok Kangri base camp with an altitude of above 5000 meters (I saw a few Polish trekkers with their Marabut tents which looked pretty robust at one fourth the cost of North Face). But it snowed quite unexpectedly that night and despite my lack of experience with such nights I managed it pretty well. First of all, the tent fought the snowfall (through the evening and well into the morning) quite valiantly and never collapsed. Several tents in the base camp area had in fact given way that night. I went out once and shook the snow off the fly sheet. I should have kept a small plate to scoop off the snow from the top of the tent (a must take item for future). I did not do this. The tent lost its shape temporarily. The poles got twisted under the weight of all the snow. Later in the morning, once all the snow melted, I corrected the shape of the poles. They were instantly back to normal. 

4. Windproof - The tent is one hundred percent windproof. In fact unless you keep the chains of the two doors a little open you might find it suffocating. Of course the area I went to isn't that windy but the nights were cold and there was some gentle breeze. But nothing entered the tent at all. I do not know how it will perform in a place like let's say Pathar Nachauni on the Roopkund trail where conditions are always extremely windy. But for normal conditions this is fine. 

I must also mention that the portion of the tent's canopy that looks like mesh isn't actually mesh. It's a see through material but not mesh. So keeping the ventilation going is the responsibility of the owner of the tent. If you pull all the zips all the way, there is no way any wind will enter the tent. 

5. Features - I don't know if these features are important but it has four pockets in the four corners of the tent to keep this and that. I would keep my medicines, flash light, mobile, charger etc in these pockets. I later realised that keeping the mobile and charger exposed to the cold is not a great idea. I started packing them up in the down jacket from then on.

There is one pocket kind of thing on the ceiling. You can keep a flashlight in it and it will diffuse the light for an even lighting. I would have preferred that pocket to be on either side of the tent. It was only on one side. If I get a tent lamp like the Moji from Black Diamond, I don't think I will need that pocket. I can then hang it from the central hook. 

6. Quality of Materials and Accessories - I had earlier expressed certain doubts about the strength of the ground sheet. After field test I take back whatever I said. The ground sheet is light but must be very strong material. Despite sleeping on rough terrain for ten days there was absolutely no abrasion anywhere on it. My only problem is I cannot seem to be able to get rid of the mud stains from it. Another of its quality is that it dries really really fast. Like in 5/10 minutes if the sun is even moderately strong.

The materials are all polyester of various grades. Polyester is a superior material for tents as opposed to nylon and most manufacturers use it except North Face. They use nylon.  I don't know why. Perhaps to make them lighter.

The three poles worked very well through the stormy night and stood their ground well. The elastic cord inside is great. But the question is for how long they will retain that elasticity.

The stakes are really light and very good. They were hammered in using stones of various shapes and sizes. So most of them lost their shape a bit. But I am fine with that. Stakes should look used.

Tashi and his partner Rowdy Rathore were very happy with the tent and particularly the quality of the stakes. I am glad that all of them came back in tact and I didn't lose any of them.

7. Space - This is supposed to be a 3-person tent. Well, unless they are three really slim people it will be difficult to accommodate them in this tent. Also the weather has to be absolutely cold so that they don't mind being really close. Additionally, these three people can only sleep together in the night. They cannot do anything else together. For example, if person 1 was organising his bag, the other two will have to stand outside.

Realistically speaking, this tent is fine for two people. For me alone, this was luxury. For three one or two nights is fine but to go on a ten-day trip with this will be really difficult.

The vestibule area of the tent is a little small. Also, if it rains heavily, there is some possibility that your large sack might get a bit wet on the outside. 

The quality of the zips is also simply great. Except when the tent was deshaped, the zips worked flawlessly.

Is This Tent Recommended? 

If you are planning to regularly go out to the Himalayas, I would suggest go for a 4-season tent. This can take some amount of snow, but I doubt it will be able to take a really bad snowfall for let's say a couple of days. You might need to clear the snow every now and then.

The tent is certainly affordable compared to big brand 4-season tents. But for a final word on its dependability I would love to sleep in it through a night of monsoon rain in the Sahayadris. 

Thursday, July 20, 2017

Coleman Sundome

About 5/6 years ago I had purchased a tent from my American friend Mitch.I think for Rs 2,000. He had brought it for his India trip (done with my Bullet) as an emergency back up. He never used it. I bought it from him alongwith an air mattress. 

Ever since, it was gathering dust at home because I never felt the need for a tent. I never even got the courage to try and pitch it as an experiment. I was curious but wasn't confident enough. Also I thought trying to do it on a field in the city would attract a lot of casual onlookers who would make a million and one stray comments. I avoided that. I was convinced that you need to pitch the tent on the field using stakes. I had no idea what a "free standing tent"meant. 

A few days ago I had it brought over from our house in Haridevpur to try my hand at pitching it at home. Having watched youtube videos I have learnt that one does not need to use stakes for a casual pitching of these tents.

After camping for several days on our way to Roopkund I thought I might as well check it out. At Bedni Bugyal we were in fact given a demonstration of how to pitch a tent. Also, I am now looking forward to more involved trekking in Indian Himalayas where carrying one's own tent from home is a must. Most Indian treks happen in places where there are no villages. People use hired tents but their qualities will always be suspect.

I must admit that I could pitch the tent successfully only after two aborted attempts. The first time I laid the tent on the drawing room floor and did everything as shown on youtube videos but I could not understand how to fix the poles so that they would stand erect. They were sliding down on the floor and going flat. 

This is a free standing tent meaning the poles don't have to be fixed to the ground and theoretically should be able to stand on its own even on a smooth floor. But it didn't happen on the first day. Anyway, I was happy to note that the tent was really big and not a one man tent. It was pretty heavy for its size though. 

What I discovered to my pleasant surprise was that packing the tent back into its bag wasn't a problem at all. It took me just a few minutes to do the job. You just have to ensure that air is pushed out of the tent as you roll it up. Initially I was more worried about packing it back than pitching it. 

I tried one more time to see if there were some sleeves or pockets in the four corners where I could slide the ends of the poles but found there was none. So I packed it back a second time. 

Last night I discovered something new from a Coleman video which solved my problem. You actually have to insert the pins attached to the rings in the four corners of the tent into the hollow ends of the poles. So once again Monisha and I tried our luck. 

And lo and behold - the tent was up. In virtually no time :-)  I was simply ecstatic. We called Mampu and entered our tent for the first time, in our drawing room. I did not spread the fly sheet because a. fly sheets need stakes to be fixed b. rolling the fly sheet back into its thin holder is a pain. We had to do that on the first day.

We were impressed by the amount of floor space available inside the tent and had a jolly good time looking at the various features of the tent. We even found a few ear plugs in a side pocket of the tent. 

Now let me give you my impressions about the tent. 

Let's get one thing clear right away. This tent is not meant for a full fledged Himalayan trek where it could rain or snow at any time. I doubt how it will hold against a strong wind either. So let's accept this as a fair-weather tent only and not expect too much in terms of protection in bad weather. The zips are not the strongest and you cannot give it to porters to pitch or un-pitch. They will ruin the zips in no time. 

To stay with the negatives of the tent, this tent also does not have any ground sheet. If you are seriously planning to use it regularly in the wild, get a decent ground sheet in size 72"x72" because the floor is 78"x78". Your ground sheet should be slightly smaller than the footprint of your tent, otherwise it will collect water in a rain.

Now among the good things about the tent. It is pretty large. The tent we used in Roopkund for the three of us was smaller than this. This one can comfortably accommodate three people and in a pinch 4 can also fit in. 

The door is adequate. a little raised from the floor level so that creepy crawlies cannot just enter the tent. There is a small plastic sheet on the ground outside the door (attached to the floor) presumably for leaving your shoes out. It also has a small window behind near the head (assuming you sleep with the legs pointed towards the door), almost at the floor level that you can open to check the weather outside or to get a cup of morning tea (if someone is available to serve it to you). 

The top half of the tent is of a net like material. Hopefully this will allow better humidity management inside. But this also means the tent offers no privacy without the fly sheet. 

When we packed the tent back inside the cover, we decided let's get the cover straightened out. Mitch had stuffed the tent with the cover inside out. As we turned the inside out we found there was a detailed instruction sheet stitched to the cover. If I had seen this earlier I could have easily worked out how to pitch it in one go. 

So here are the pros and cons of the tent once again 

Pros - 

- ridiculously cheap
- spacious
- easy to pitch and un-pitch
- easy to pack back in its cover

Cons

- not the strongest materials
- may not work in rain or snow
- zips should be handled very carefully
- poles are light but did not seem very strong
- relatively heavy
- packed size is much larger than similar sized but more expensive tents 
- cannot be stuff packed (like a down sleeping bag) 

Bottomline - keep it in the car as an emergency back up for long distance trips but don't take it on a Himalayan trek.